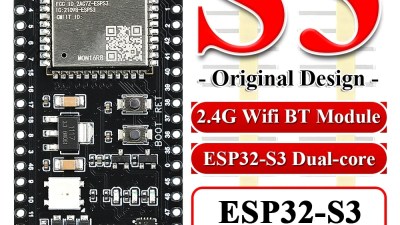
When you want to build a truly custom smart home device, off-the-shelf products might not always fit your exact needs. This is where development boards like those based on the ESP32 and ESP32-C3 chips come in handy. These small, powerful computers with built-in Wi-Fi and Bluetooth let you create almost anything, from a custom sensor to a smart display, and connect it directly to Home Assistant.
Updated November 2026.
This guide compares three popular ESP32 and ESP32-C3 development boards available on AliExpress in November 2026. We look at their features, what makes each one unique, and how well they work for different Home Assistant DIY projects using ESPHome, a special firmware that lets you control these boards directly from Home Assistant.
Our picks at a glance
- Best overall: ESP32-S3 4.0-inch Display Board. This board combines powerful ESP32-S3 processing with a large, vibrant display, perfect for advanced Home Assistant dashboards or custom interfaces.
- Best budget: ESP32-C3 OLED Mini Board. It is the most affordable option, offering basic Wi-Fi and Bluetooth capabilities with a small OLED screen for simple data display.
- Best for beginners: ESP32-S3 Basic Development Board. The basic ESP32-S3 board is a great starting point for beginners due to its versatility, ample memory, and standard pin layout for various projects.
Side by side
| Product | Price | Rating | Protocol | Home Assistant | Local or cloud | Power |
|---|---|---|---|---|---|---|
| ESP32-S3 Basic Development Board | $6-9 | 4.5 / 5 | Wi-Fi, Bluetooth LE | ESPHome | Local with ESPHome | USB-C |
| ESP32-S3 4.0-inch Display Board | $21-28 | 4.4 / 5 | Wi-Fi, Bluetooth LE | ESPHome | Local with ESPHome | USB-C |
| ESP32-C3 OLED Mini Board | $3-5 | 4.5 / 5 | Wi-Fi, Bluetooth LE | ESPHome | Local with ESPHome | USB Micro-B |
The products in short
ESP32-S3 Basic Development Board
Best for: General DIY projects, learning ESPHome. Price: $6-9.
This ESP32-S3 development board is a versatile choice for many Home Assistant DIY projects. The ESP32-S3 chip offers good processing power, and this specific board comes with 16MB of Flash memory and 8MB of PSRAM, which is plenty for complex ESPHome firmware. You can use it to build custom sensors, smart switches, or small automation controllers. Its standard pin layout makes it easy to connect various external components like relays, temperature sensors, or buttons. The listing says it supports Arduino IDE, making it approachable for those familiar with that environment.
It is powered via a modern USB-C port, which is convenient. This board is known to be well-supported by ESPHome, allowing for deep local control and integration with Home Assistant. Buyers often report reliable performance for a wide range of applications, from reading environmental data to controlling LED strips. If you are looking for a solid foundation for your Home Assistant hardware experiments, this board is a strong contender.
ESP32-S3 4.0-inch Display Board
Best for: Custom smart displays, interactive dashboards. Price: $21-28.
The ESP32-S3 4.0-inch display development board is ideal for creating interactive smart home interfaces. It features a large 4.0-inch, 480×480 pixel capacitive touch display, letting you design custom dashboards or control panels directly connected to Home Assistant. The ESP32-S3 chip provides enough power to run graphical user interfaces (GUIs) smoothly using libraries like LVGL, which is supported by ESPHome. This means you can show sensor data, control lights, or arm your security system right from the device itself.
The listing says it includes Wi-Fi and Bluetooth for connectivity. It is a more advanced option than a basic development board, best suited for users who want to add a visual element to their DIY projects. Buyers often report that these display boards are excellent for creating dedicated Home Assistant control screens for specific rooms or functions. While it is more expensive, the integrated display and touch functionality open up many creative possibilities for a truly custom smart home experience.
ESP32-C3 OLED Mini Board
Best for: Small, low-cost sensors or indicators. Price: $3-5.
This super-mini ESP32-C3 OLED development board is a great option when space and budget are tight. It features the ESP32-C3 chip, which is a slightly simpler but still capable processor compared to the ESP32-S3, offering Wi-Fi and Bluetooth LE. The standout feature is its tiny 0.42-inch OLED display, perfect for showing small pieces of information like temperature readings, a device’s status, or simple notifications without needing a full screen. Its ceramic antenna keeps the overall size very small.
Because of its compact size, this board is well-suited for embedding into small enclosures or for projects where a minimalist display is sufficient. It is known to work with ESPHome, allowing you to program it for local control and integrate it with Home Assistant. While it uses a USB Micro-B port, which is an older standard, it remains a very cost-effective way to add custom Wi-Fi capabilities and a small display to your smart home setup. Buyers often pick it for simple, discrete sensor projects.
How to choose
How to Choose the Right ESP32 or ESP32-C3 Board for Home Assistant
Picking the right development board depends on what you want to build. Here are the key things to think about:
Processing Power and Memory (ESP32-S3 vs. ESP32-C3)
The main difference between these boards is the chip they use. The ESP32-S3 is generally more powerful, with a faster processor and often more memory (Flash and PSRAM). This makes it better for projects that need to do a lot of work, like running a complex graphical display or handling many sensors at once. If you plan to build a custom dashboard with a touch screen, an ESP32-S3 board, especially one with extra PSRAM, is a good choice.
The ESP32-C3 is a simpler, more power-efficient chip. It is great for basic tasks like reading a few sensors, controlling a relay, or acting as a simple Wi-Fi presence detector. If your project does not need a screen or a lot of complex calculations, an ESP32-C3 board can save you money and might even use less power.
Integrated Display or No Display
Some boards come with built-in screens, like the 4.0-inch display or the small OLED. If your project needs to show information or have touch controls, a board with an integrated display saves you the trouble of buying and connecting one separately. For example, the ESP32-S3 4.0-inch display board is perfect for creating a dedicated Home Assistant dashboard. If you just need a board to collect data from sensors and send it to Home Assistant, a board without a screen will be cheaper and simpler.
Connectivity and Protocols
All ESP32 and ESP32-C3 chips have built-in Wi-Fi and Bluetooth LE. This means they can connect directly to your home network and talk to Home Assistant using ESPHome. If you want to add other smart home protocols, like Zigbee or Thread, you would typically need to add an external module to the board. For most DIY projects, Wi-Fi through ESPHome is the primary way these boards connect to Home Assistant.
Power Source and Size
Most of these boards are powered via a USB port, often USB-C, which is the newer, more convenient standard. Some older or smaller boards might use USB Micro-B. Consider how you will power your device in its final location. If you need a very small device, like for a hidden sensor, the physical size of the board matters. The ESP32-C3 OLED mini board, for example, is very compact.
Ease of Use with ESPHome
All the boards listed here are known to work well with ESPHome. ESPHome is a powerful tool that lets you write simple configuration files to define how your board works and how it connects to Home Assistant. It handles all the complex coding for you, making these boards very accessible even for beginners who are not software developers.
Setup notes for Home Assistant
Setup Notes for Home Assistant with ESP32/ESP32-C3 Boards
Setting up an ESP32 or ESP32-C3 development board with Home Assistant primarily uses ESPHome. ESPHome is a system that lets you create custom firmware for your ESP devices and integrate them directly into Home Assistant for local control. Here are the general steps:
-
Install ESPHome on Home Assistant
First, you need to add the ESPHome add-on to your Home Assistant instance. Go to Settings > Add-ons > Add-on Store. Search for “ESPHome” and install it. Once installed, start the add-on and open its web interface.
-
Create Your ESPHome Configuration
In the ESPHome web interface, click the “+” button to create a new device. You will be guided through setting up a basic configuration file (a YAML file). This file tells the ESP32 board what it is, how to connect to your Wi-Fi, and what components (like sensors or relays) it has. For example, you would define your Wi-Fi network name and password here.
-
Flash the Firmware to Your Board
Once your configuration is ready, connect your ESP32 or ESP32-C3 board to your computer using a USB cable. In the ESPHome interface, click “Install” on your device. You can choose to install it directly from your browser (if supported) or download the firmware file and use a tool like ESPHome-Flasher to upload it to the board. This process writes the ESPHome software and your custom settings onto the chip.
-
Connect to Home Assistant
After the firmware is flashed and your board is powered on, it will connect to your Wi-Fi network. Home Assistant should automatically discover the new ESPHome device. You will see a notification asking if you want to set it up. Click on it and follow the steps to add the device. If it does not appear automatically, go to Settings > Devices & Services > Add Integration and search for “ESPHome”.
-
Access Entities in Home Assistant
Once added, all the components you defined in your ESPHome configuration (like sensors, switches, or lights) will appear as entities in Home Assistant. You can then add them to your dashboards, use them in automations, or view their status just like any other smart home device.
Frequently Asked Questions
What is ESPHome and why is it good for Home Assistant?
ESPHome is a tool that lets you customize the software (firmware) on ESP32 and ESP32-C3 boards very easily. It is great for Home Assistant because it provides full local control over your DIY devices, meaning they do not rely on cloud services. This makes your smart home faster, more reliable, and keeps your data private. You define what your device does using simple configuration files, and ESPHome handles the rest, making it accessible even for beginners.
Can these ESP boards connect to Zigbee or Thread networks?
Out of the box, these ESP32 and ESP32-C3 boards only have Wi-Fi and Bluetooth LE connectivity. They cannot directly connect to a Zigbee or Thread mesh network. However, you can add external modules to these boards to give them Zigbee or Thread capabilities. For example, you could connect a Zigbee radio module and use the ESP board as a Zigbee coordinator or router with specific firmware. This is a more advanced DIY project.
Do I need to be a programmer to use these development boards with Home Assistant?
No, you do not need to be a skilled programmer. While these are ‘development boards,’ ESPHome significantly simplifies the process. Instead of writing complex code, you define your device’s functions using a straightforward configuration file (YAML). ESPHome then generates and compiles the necessary code for you. If you can follow instructions and understand basic concepts like sensors and switches, you can successfully use these boards with Home Assistant.